Back in the day I used Cubase. Then around 2003 I got a free Nuendo license because I did a project for the importer. A few years later I bought Sonar (what the heck was I thinking?).
But for the longest time I have been using the combo Reason (since 2000) and Ableton Live (since 2001). But since a few weeks I added another DAW to my arsenal: Reaper. Why? Well…
Ableton Live is great for editing audio but it is seriously lacking features for podcast editing. For example, most of my clients work with full transcripts. So these clients send me a Google Doc with time notations and selected text from the transcript. I then need to find the segments and drop those in the DAW. In Live you have to manually skip through the file to search for the segment. In Reaper I can simply double click on an audio item and it will open the Properties so I can type in the time and I’m all set. Way faster!
Project Media/FX Bay
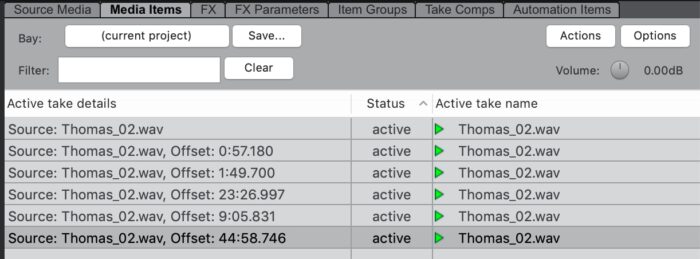
The media items I am using in my Project are shown in the Project Media/FX Bay window. Live lacks this, there’s no list of information on which audio files you are using in your project.
the Project Media/FX Bay
The Project Media/FX Bay is a one stop center for managing and arranging a project’s FX and media items.
For example, you can lookup which items are used (active) and which are not. And you can find the time records of the starting points of those items (Offset).

Ripple Edit
In Reaper we have Ripple Edit. With it I can simply grap an item and drag the whole project to the right to make space for new items to be inserted. In Live you can only insert a space but it will create a cut for all the items in the selection which you need to fix after doing the insert. With Ripple Edit you are moving items without breaking them.
Reaper offers easy ways to Group items. Or to Lock them so they won’t move when dragging. In Live you can only Group tracks not clips/items which is like 😭
Gotta love LUFS
When I press my N-key an audio item is set to -23 LUFS (dynamic European radio standard). Also, adjusting the level of an item can be done with a few key stokes to set it a few half dB’s higher or lower. Excellent!
Keystroke combinations in Reaper can be set to your own preferences. The program is totally customisable which might feel a bit overwhelming at first. A dizzying number of screens and setting options are available. Still, you can keep it simple and control everything via key combinations. And by the way, you can right click on almost all the elements in Reaper and find extra settings.
Thanks to Brendan Baker
It was this video by the wonderful (great editor / sound designer) Brendan Baker which made me switch from Live to Reaper in a very smooth way. It took me about four days to learn all the stuff Bredan talks about in his video. But after it I was able to do a complicated edit with no sweat. In fact: I totally LOVED editing this podcast episode:
Years ago I heard Brendan Baker and Nick van der Kolk talk about Reaper. Together they made Love + Radio which influenced me greatly. Their way of editing, music selection and sound design is still the norm as far as I am concerned.
And now I also made the switch.
Of course there’s more I can tell you about Reaper and podcasting. That’s for another time…
